THIS ARTICLE MAY CONTAIN AFFILIATE MARKETING LINKS! IN CASE YOU MAKE A PURCHASE THROUGH ONE OF THE LINKS, WE'LL GET A SMALL COMMISSION. WITH NO EXTRA CHARGES TO YOU. THANKS!!
Table of Contents
- What is the Rule of Thirds for Photography and Intersection Points?
- Applications of the Rule of Thirds
- When not to Use the Rule of Thirds
- Conclusion
If you just getting started with photography, you might be trying to learn and understand the rule of thirds for photography. And if you are a pro in the field of photography it is good to refresh the basics. No matter the level of photography knowledge you possess, this article will help in understanding, refreshing, and learn the rule of thirds for photography.
We will deep dive into the most basic concepts to remember. With the fundamental goal of helping you come to understand and learn the concept of the rule of thirds. And it will be helpful to further develop your photographs and photography skills.
What is the Rule of Thirds for Photography and Intersection Points?
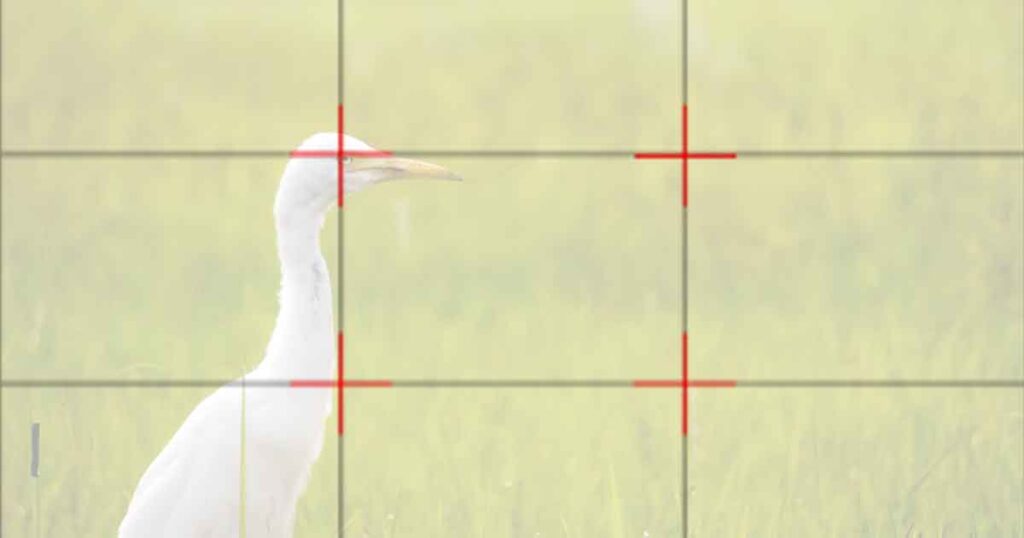
The fundamental principle behind the rule of thirds is to divide a picture into thirds (both on horizontally and vertically), with which we will be left with nine sections.
And as for the theory, it goes like this, if we place points of focus at the intersections or along the lines, the photograph we are going to take will turn out to be more balanced. Some pictures will require more than one point or line of the rule of thirds, while others will require the application of a single line or point in the composition. And let different elements of the picture stay behind in the background.
Studies have shown that while seeing a picture, our eyes will naturally go to the points of the intersection as opposed to the central point of the shot. Using the rule of thirds works coherently with the natural way of viewing images. When you begin to perceive the rule of thirds in the images, it will be hard to ignore it.

Applications of the Rule of Thirds
You can use the rule of thirds with every aspect of photography and compositions you need to make. Let’s take a look at the application of the rule of thirds for taking different types of shots.
Use in Portraits
Below some of the hints are listed for you to take portraits while using the rule of thirds,
- Attempt to align and line up the subject’s body to one of the vertical lines on the grid.
- If the subject is facing the right, then attempt to align the subject with the vertical line on the left side of the grid and vice-versa. This will make your shots more balanced.
- You can easily make your photographs stand out. By positioning your model in creative ways. This way you can use negative space to make creative shapes or convey a mood. You can practice by looking at your model from different angles and directions.
- While you’re capturing a moving subject, always be aware of where you’re putting the model. As it conveys what the model is doing if they are either moving out of the frame or moving into the frame.
- Sometimes you will be taking portraits and the subject of your photograph will be in the middle. Whenever this occurs, attempt to shoot the model while leaning to one of the sides in order to create more visual interest.
- In situations where you’re taking a close-up shot of two individuals, try to place their faces in different thirds. For instance, making every individual sit on an alternate step of a flight of stairs. This conveys substantially more visual interest than lining them up in a single line.
- When you are taking a picture of a group, you can put a portion of the subjects in horizontal and vertical lines and after that try to scatter some of the subjects at intersection points, as opposed to gathering them in a single block.
Use in Landscapes
You can also apply the rule of thirds when you need to take a photo of a landscape, just follow these simple tips,
- Start by aligning the horizon line with one of the horizontal lines of the grid. Whether you place the horizon line in the top or base third of the picture. It will assume a key part in the overall composition, whichever element in the composition get the large section of the picture, will be seen undeniably.
- The Horizon line does not need to fix up precisely with the horizontal line of the grid. The key here is to utilize the rule of thirds grid to line up a better shot with great composition. And remember to avoid placing the horizon line in the center as it would end up slicing the picture down the middle.
- Include various elements inside your scene that you need to highlight and attempt to put them close to one of the intersection points of the grid. Keep in mind, that this is where individuals will look first.
When not to Use the Rule of Thirds
One of the most concerning issues with the rule of thirds for photography is that it does not change and does not offer any flexibility. It basically does not consider what is being shot. For instance, while shooting moving scenes, you might be compromising the composition and excluding significant elements just to follow the rule of thirds. And it is true for any kind of off-center composition too. And sometimes it is better to go with your instincts.
Conclusion
It truly pays to use the rule of thirds in photography, particularly for the people who are simply beginning to find out and learn about photography. In any case, as you progress, you will start to understand that great composition is not tied in with complying with set standards, but it’s about taking every photograph on its own merit. Various compositions will be ideal in different circumstances. While the rule of thirds functions perfectly for certain photos, it isn’t the best way to take a good picture. As a matter of fact, any type of composition can be great, and you will not grow and miss opportunities if you never go past the rule of thirds.


