THIS ARTICLE MAY CONTAIN AFFILIATE MARKETING LINKS! IN CASE YOU MAKE A PURCHASE THROUGH ONE OF THE LINKS, WE'LL GET A SMALL COMMISSION. WITH NO EXTRA CHARGES TO YOU. THANKS!!
Table of Contents
First and foremost, even though Photoshop is a very powerful and versatile software capable of photo editing to 3D graphical work. It is a raster-based software and is not ideal for making logos. One of the main qualities of a logo is its scalability. Generally, a logo is scaled up and down as per the requirement. So, it is important that it does that without losing any quality and detail. That’s why vector-based software like Illustrator is used for creating a logo design. Working with a vector-based program means it works on vectors to create logos without any loss of details.
With that out of the way let’s talk about How to make Logo with Photoshop.
HOW TO MAKE LOGO WITH PHOTOSHOP
1. Create a New Document
Let’s get started, first of all open Photoshop. And create a new document. Here i have used a canvas size of 1000px*1000px. We are making a square canvas so that it can be easily divided using grids and guides. You can work with an even bigger canvas and we can adjust canvas size later too. Now set your resolution to 100, and leave the color mode to RGB and 8 bit. Hit OK to create a New Document with these settings.
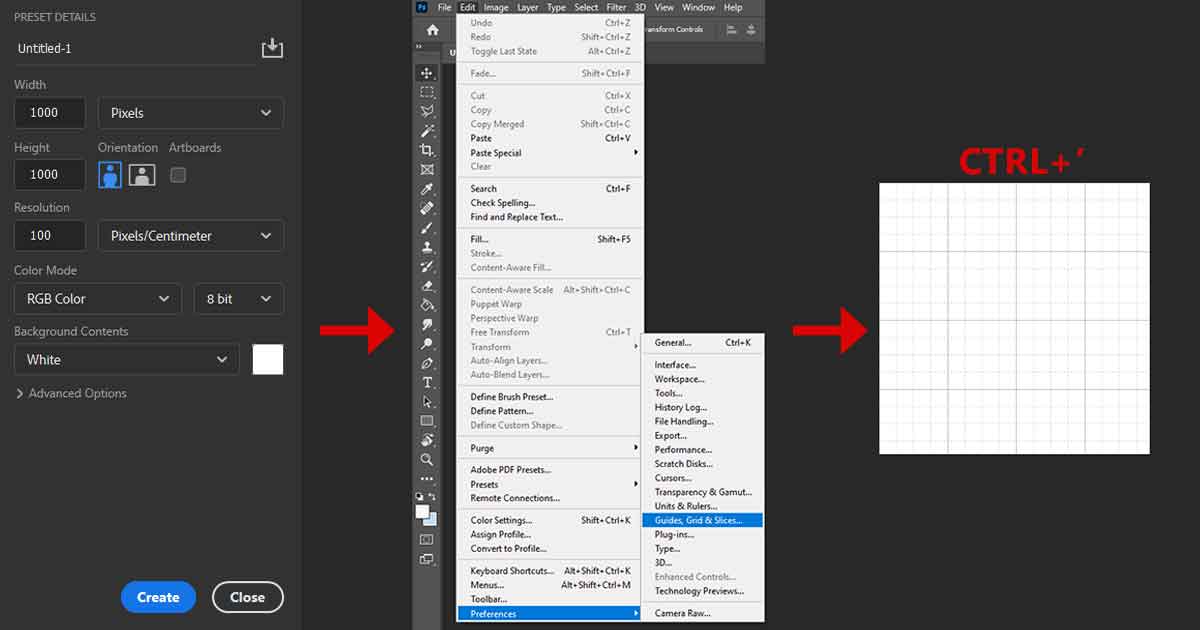
Now go to EDIT > PREFERENCES > GUIDES, GRID, & SLICES. In the GRID section type 1 in GRIDLINE EVERY option and select INCHES with SUBDIVISIONS set to 4.
In order to get the GRID to show up on the canvas. You can either go to VIEW > SHOW > GRID, or you can use the shortcut CTRL+ ‘.
2. Import the sketch of the Logo
There are a few things you can for getting your sketches of the design in Photoshop. SCAN or CAPTURE a picture of the sketch of the design you want to work on. Then, have it transferred to your PC or Laptop. Then to get the sketch in photoshop you can either do,
- DRAG and DROP the picture in the photoshop it will automatically make a NEW LAYER for your image.
- If you have access to a drawing tablet you can simple sketch out the design in photoshop.
3. Start working on the Design
Now we will create a new layer to work on. For creating a new layer you can either do so by CLICKING on the NEW LAYER button at the bottom of the LAYERS PANEL. Or you can use the shortcut SHIFT+CTRL+N to create a new layer.
Now start tracing over your sketch with PEN TOOL. You can select the pen tool in the toolbar, or by pressing the key P which is a shortcut. After selecting the pen tool make sure to check that it is set to SHAPE, it is on the left of in OPTION BAR.
You can also use SHAPES for creating basic shapes by selecting them from the TOOLBAR. There are a few shapes present in photoshop namely, rectangle, rounded rectangle, ellipse, polygon, line, and custom.
4. Use Colors through Gradient
Even though the right colors in the solid and plain form can look good in a design. Try to use GRADIENT in the design. As it can easily add more character to your design. With the gradient, you can make a blend of different colors. And create various effects just by using them correctly and in the right manner.
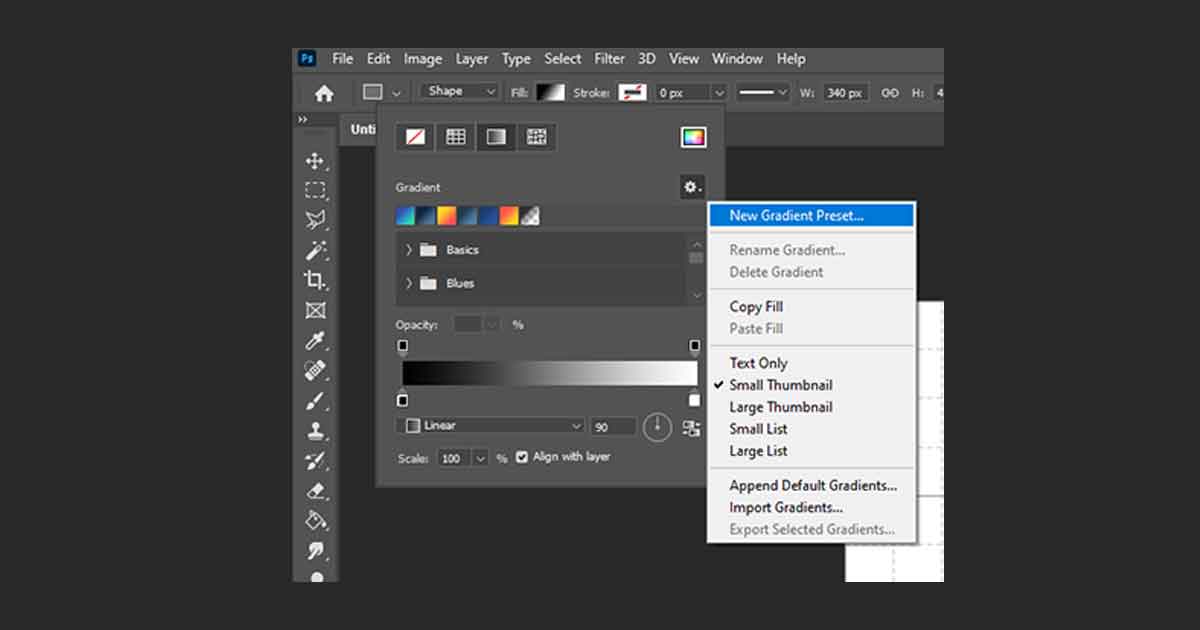
For making a GRADIENT of your choice follow these steps. Select a new gradient from the FILL drop-down menu in the left of the OPTION BAR. Now in the gradient window double-click on the slider at the bottom to bring up the RGB options. Here you can select colors according to your need. After creating your gradient it is time to apply it on the shape you made in the design.
If you have MOVE TOOL selected it may be possible that you cannot find the FILL option. Try selecting PEN TOOL, or SHAPE TOOL.
5. Add Details
After getting done with the shape, and the color of the design. It is time for adding details to the design. The act of just adding small details to the design can take the design to next level. Minor details provide personality and character to the design and make it stand out more. One of the most simple types of detail that you can add to a design is to add highlights in different areas. You can even try adding textures to the design to make it pop out even more.
6. Type Something
In order to complete the logo, it is important to add some text to it. The name and tagline of the business are the things that are written along with a logo design.
It is very important to select the right typeface for the text used in the design.
For typing your text follow these steps. Start by selecting the TYPE TOOL from the toolbar, or pressing the key T it is the shortcut for the tool. With the tool selected click anywhere on the canvas and a blinking cursor will appear at the point. Now begin typing. After typing your desired text you will have to select MOVE TOOL from the top of the TOOLBAR. With the move tool selected you can freely move and place your text. If you want to add or delete something from the text then just select the type tool again and click and the text.
6.1 Choosing color for the Text
It is important to keep in mind that the text is also part of the whole design. So, the color used in the text should be complementary to the colors of the design. And must be used in a way that enhances the design.
7. Make different Iterations
Before finalizing the design it is time to make different iterations of the design. In this phase, we will try out different things with the design. Try different colors, fonts, font, and design placement, turn the design black and white, and so on. There are lots of different things that you can try. Not each and everything will look but it will help you in making changes to the design and give you new ideas, and inspiration.
For the purpose of making iteration, you must first make duplicate copies of the design. To make duplicates of the design simply select all the layers that you worked on including the text layer. And right-click on the selected layers and select MAKE SMART OBJECT. This way your layers will get organized in the smart object. Now just duplicate the smart object by pressing CTRL+J. And you can make changes to the design on that layer by double-clicking on it. When the pop-up comes just hit OK on the pop-up for opening the smart object.
8. Save, Export, and Share
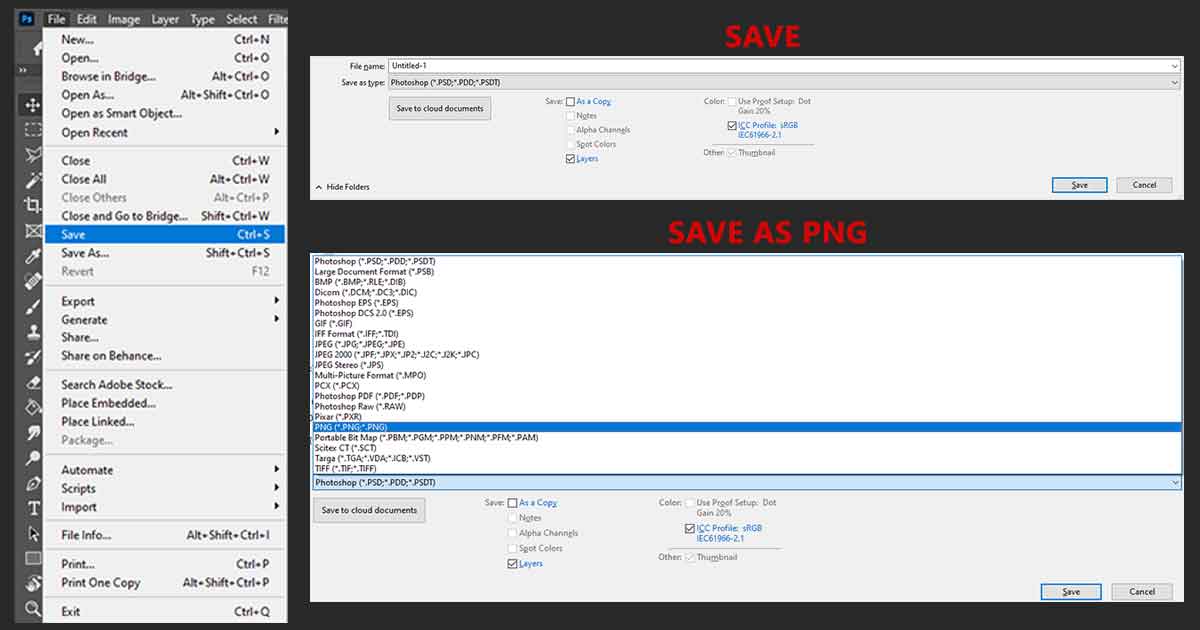
After finalizing the design it is time to save the design. To save the design you just have to press CTRL+S, and name the file, and hit SAVE. Another way to do this is by going to FILE > SAVE. Now that we have saved our file it is time to export the logo design. Remember to always export a logo design in PNG format. For this step again press CTRL+S, and now from the drop-down menu select PNG and hit save your design will be saved.
As you can see you can easily make a logo in Photoshop. And remember to make sure that the text is readable, design is clean and simple. One of the most important things is to keep the process simple, if something goes wrong just undo it and start again.